

The team of decking professionals in the Duradek network have shown time and time again that "it is all in the details". Duradek installer Matt McClure of Dekmax in Salt Lake City, Utah is a perfect example of how top performing waterproofing requires not only an excellent product, but also a professionally trained installer that is an expert in the intricate details critical to successful waterproofing.
One of Matt's Tiledek installations was for a very challenging deck project in Salt Lake City, and was featured on Ideas For Deck Designs website. This article is an excellent explanation of the details involved in adding an exterior tile deck and is presented in an easy to understand step-by-step sequence.
We've listed the steps involved for you here, but highly recommend you get the full details of the specifics if you'd like to educate yourself on the best practices of installing an outdoor tile deck.
 Step #1 - Build the New Balcony Decks
Not always as simple as throwing down some plywood. All sorts of considerations such as soil conditions, imposed loads and of course, proper slope must be factored into the plans. Read more....

Step #2 - Prepare the Surface
3/4" tongue and groove plywood is the recommended deck surface and although it is possible to install the Tiledek waterproof membrane to plywood it would first require a lot of filling preparation. Duradek recommends use of a cement board on top of the plywood as an excellent substrate. Read more....

Step #3 - Install Cement Board
A bed of thinset mortar must be applied to set the cement boards properly, and should be allowed to cure properly before application of the membrane.
Read more...

Step #4 - Prepare Wall Flashing
Keeping your waterproofing intact where deck meets wall takes precision and accuracy. Read more....

Step #5 - Lay Out Duradek Ultra Tiledek
The material is heavy and cut in economical lengths and it must be laid out before applying the adhesive. But first the deck surface must be checked for cleanliness and be free of any obstructions. Check out the video...

Step #6 - Apply the Adhesive
The easiest method of applying adhesive to the deck surface is to fold the Tiledek membrane in half along the length of the roll and apply latex adhesive using a thick roller. Contact adhesive is used around the perimeter edges. Check out the video...
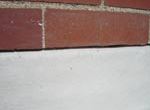
A very important detail to pay attention to, proper wall flashing details include ensuring the Tiledek is glued down flat and smooth right up to the transition point at the wall, leaving plenty of material to flash up the wall. Read more....

Step #8 - Triple Weld the Seams
The most important step of all, this is not something for the amateurs to try. Duradek ensures that all of their applicators are professionally trained on this critical step. Watch the video...

Step #9 - Weld Column Patches
Corner patching details are an important step to finish the waterproofing details. With accuracy critical to performance and appearance, this is one more step where you would appreciate the skills of the trained professionals. Read More....

Step #10 - Applying The Bond Coat
Now that the waterproofing is professionally installed, the tile can be laid traditionally which includes the application of a bond coat. Read More....

The tiles are applied over the bond coat, and with Duradek's tested methodology this is not just a tile deck job, but an entire waterproofing system for your outdoor living space. Read more...

While installing the tiles, you must ensure to install expansion joints every 8 or 10 feet. This is particularly important in environments that are subject to extreme temperatures. If the tile has room to expand, they won't crack or lift. Read more...

Step #13 - Grout the Tiles
One of the final steps to completing your outdoor tile deck is to grout the tiles and allow time to cure. Read more.....
And at the end of all the laborious and detail specific stages of an outdoor tile deck installation, the result is a beautifully finished tile deck, just waiting for its railings to be installed.
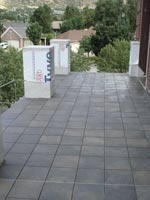
Matt from Dekmax and the good folks at Ideas For Deck Designs online have provided an incredibly easy to follow sequence that clearly illustrates the importance of details and how the Duradek Ultra Tiledek and the recommended system can provide far superior results in waterproofing under exterior tile than we have seen in the past.


No comments:
Post a Comment